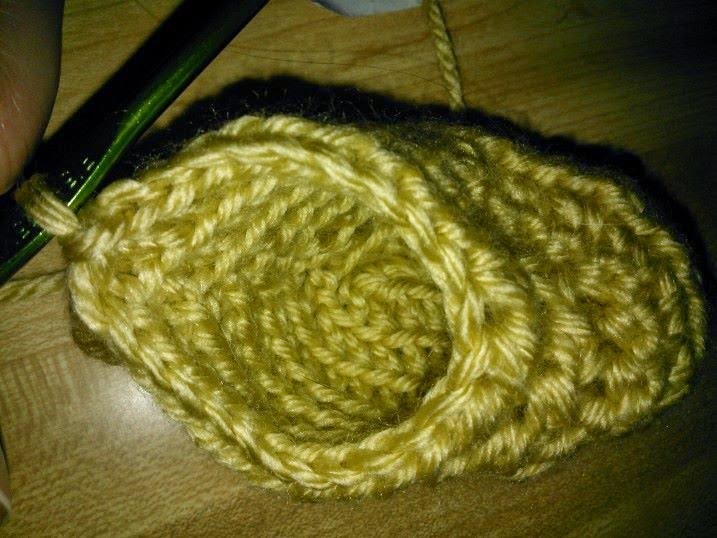
I went to another Giving Artfully Charity Crafting Night this month.
I had a great time being with some really nice people, making things for charity, and enjoying some good snacks.
I made some baby booties, which came out really well. It took me a few tries to get it right, but I got it in the end.
Here are some pictures of the booties I made.
Showing posts with label crafts. Show all posts
Friday, May 23, 2014
Wednesday, April 9, 2014
Meetup #3: Making Hats for Preemies and Pillowcases for Cancer Patients
Today was the third Meetup event I went to. It was a charity craft event, where we made hats for preemies, and pillowcases for cancer patients.
I hadn't done any knitting or crocheting in a while, so this was a perfect excuse for me to start up again.
The women there were very nice, although I think I was the youngest one there. But, I had a good time.
I crocheted a hat, and it came out pretty good, although I made a minor mistake during the process. Here is a picture of the finished product:
Purple is my favorite color, so that's why the hat is purple. It looks pretty good, seeing as this is only the second thing I've crocheted.
All in all, today was a good day, and I am so happy that I was able to make something for someone in need.
Labels:
cancer,
crafts,
crocheting,
hats,
knitting,
Meetup,
pillowcases,
preemies
Monday, March 31, 2014
Little Dresses for Africa
I checked out a magazine today from the library, called Kiki Magazine. It's a fashion magazine for girls, and it's pretty interesting.
In the most current issue, there is an article about an organization called Little Dresses for Africa.
Little Dresses for Africa is an organization a Michigan woman started, when she had gone on a trip to Africa several years ago, and saw how poor the childrens' clothes were there. She decided to start making pillowcase dresses for them, and that is how this organization came to be.
People can make their own pillowcase dresses, and send them to Little Dresses for Africa, to be given to girls in Africa.
This is a wonderful thing to do, and I hope to make some dresses, once I become a better sewer.
You can also donate money, or other items for these precious children. You can find out how here.
Please consider helping out for a great cause. It is well worth it!!
Thursday, November 7, 2013
Girls of God's Heart: Thanksgiving Projects
Girls of God's Heart: Thanksgiving Projects: Thanksgiving is just around the corner which for most means family, food, and football. But how do you continue to remember to truly be tha...
These are great ideas!! Thanks Girls of God's Heart girls for sharing these!!
Friday, April 22, 2011
Clock
Materials:
Paper plate
Cork
Paper fastener
Plastic bag
Different colors of paint
Paint brush
Old toothbrush
Clear tape
Scissors
Paper plate
Cork
Paper fastener
Plastic bag
Different colors of paint
Paint brush
Old toothbrush
Clear tape
Scissors
- Paint the paper plate.
- Using a toothbrush, sprinkle different colors of paint. Then, paint the twelve numbers with different colors of paint.
- To make the clock hands, cut two arrows out of cardboard, one longer than the other. Decorate them with stripes. Make a hole at the end of the clock hands.
- Fasten the hands to the center of the clock by making a hole with the paper fastener. Glue the cork to the paper fastener. Glue a bag handle onto the back of the clock so you can hang it on the wall.
Helicopter
Materials:
Plastic container
Cardboard
Two toothpicks
Two craft sticks
Cork
Cloth scrap
Different colors of paint
Paintbrush
White glue
Clear tape
Scissors
Plastic container
Cardboard
Two toothpicks
Two craft sticks
Cork
Cloth scrap
Different colors of paint
Paintbrush
White glue
Clear tape
Scissors
- For the window cut out a piece of cloth and glue it to the container.
- For the landing skids, cut out three pieces of cardboard for each one, and glue them together. Paint stripes on them.
- For the tail, cut out a strip of cardboard. Glue two toothpices to the end in the shape of an "X." Paint the tail.
- Attach the landing skids and the tail to the container. Use clear tape for the landing skids. Make a small slot in the container for the tail.
- For the rotors, glue two craft sticks in the shape of an "X" on top of the cork. Paint them. Glue them to the helicopter.
Penguin
Materials:
Paper towel tube
Cardboard
Different colors of paint
Paintbrush
Marker
White glue
Stapler
Scissors
Paper towel tube
Cardboard
Different colors of paint
Paintbrush
Marker
White glue
Stapler
Scissors
- Draw the shape of a head with a marker on the top of the tube. Cut out around the head.
- Make the wings and beak out of t he leftover pieces of tube. Staple the wings to the body and glue the beak on the face.
- Trace the outline of the tube, and add feet, on a piece of cardboard. Cut it out. Glue it to the bottom of the tube.
- Paint the penguin, leaving the stomach and face unapinted.
- Paint the penguin's beak and feet with orange paint.
Box Cake
Materials:
Round cardboard box
paper plate
Plastic container
Plastic cup
Different colors of paint
Paintbrush
Old toothbrush
White glue
Round cardboard box
paper plate
Plastic container
Plastic cup
Different colors of paint
Paintbrush
Old toothbrush
White glue
- Paint the box and the plate.
- Paint stripes around the plate. Use the old toothbrush to sprinkle on some paint.
- Decorate the side of the box with triangles and dots. Sprinkle on some paint with the toothbrush.
- Paint strips on the plastic container. Paint its rim red.
- Glue all the parts one ont top of the other. Glue the plastic cap on top as if it were a cherry.
Firefighter
Materials:
Empty plastic bottle
Egg carton
Rope
Balloon
Crepe paper
Tissue paper
Red tape
Paint
Modeling clay
Paintbrush
Masking tape
White glue
Empty plastic bottle
Egg carton
Rope
Balloon
Crepe paper
Tissue paper
Red tape
Paint
Modeling clay
Paintbrush
Masking tape
White glue
- Cover the bottle with red and orange tissue paper. Wrap red tape around the bottle.
- Make the eyes and the nose out of modeling clay. Glue them onto the bottle cap.
- Cut out a long strip from a piece of balloon. Tie it around the bottleneck for the arms.
- Cut out a cup from the egg carton. Paint it, and put it on top of the bottle cap.
- For the hose, attach some crepe paper to the end of the rope with masking tape and wrap it around the firefighter's body.
Spinning Top
Materials:
Old CD (ask permission first0
Different colors of paint
Paintbrush
Toothpick
Cork
Double-sided tape
Old CD (ask permission first0
Different colors of paint
Paintbrush
Toothpick
Cork
Double-sided tape
- Paint the center of the CD.
- Paint triangles from the edge to the center of the CD.
- Finish painting it with different color triangles.
- Stick a toothpick in the cork top and paint the cork.
- Tape the cork onto the CD with double-sided tape.
Hippopotamus
Materials:
Mold for storing bottles or white cardboard tubes
Toilet paper tube
Different colors of paint
Paintbrush
Scissors
White glue
Mold for storing bottles or white cardboard tubes
Toilet paper tube
Different colors of paint
Paintbrush
Scissors
White glue
- Cut out one of the bottle cartons and cut off the neck.
- Use the bottleneck to make four legs, ears, and a tail. Glue them to the body.
- Paint the hippopotamus. Let dry.
- Paint the eyes, the nose, and the inside of the ears.
- Make a bird out of a piece of cardboard, paint it, and glue it onto the hippopotamus.
Doll
Materials:
Two different plastic containers
Two big corks
Cardboard
Magazine page
Thick string
Thin string
Different colors of paint
Paintbrush
Clear tape
White glue
Scissors
Two different plastic containers
Two big corks
Cardboard
Magazine page
Thick string
Thin string
Different colors of paint
Paintbrush
Clear tape
White glue
Scissors
- Ask an ault to help you make a hole in the bottom of each container. Connect them with the thin string. Tie a knot at the end of the string.
- Cut out two circles of cardboard and paint a face on one of them. Glue them to the string just above the container.
- Cut hands out of cardboard. Tie a piece of red string around the neck and glue the hands to the ends of the string.
- For the legs, make a small hole in each cork. Glue a piece of string in the hole of each cork. Attach the string to the inside of the container with clear tape.
- For the hair, cut out a small rectangle from a magazine page. Make small cuts in the rectangle to make hair. Glue it onto the head.
Ladybug
Materials:
Egg carton
Small cork
Different colors of paint
Paintbrush
White glue
Scissors
Egg carton
Small cork
Different colors of paint
Paintbrush
White glue
Scissors
- Cut two cups out of the egg carton. Cut out the part of one of them to make the wings.
- Paint the wings red and the body black. Let dry.
- Paint black dots on the wings. Let dry. Glue them to the body.
- Paint a face on the wide part of the cork and glue it to the body.
- For the antennas, cut out a long strip from the egg carton and paint it black. Glue it to the head. Let dry.
Wednesday, April 20, 2011
Worm
Materials:
Three toilet paper tubes
Two bottle caps
Cork
Different colors of paint
Paintbrush
Stapler
White glue
Scissors
Three toilet paper tubes
Two bottle caps
Cork
Different colors of paint
Paintbrush
Stapler
White glue
Scissors
- Cut the three toilet paper tues in half the long way.
- Staple together the sides of the six pieces.
- Paint the pieces any way you wish. You can even paint on stripes!
- For the nose, glue the cork top to one end. Paint the tip of the cork. Paint a mouth.
- Paint eyes inside the bottle caps. Glue them to the face.
Camel
Materials:
Egg carton
Cork
Four clothespins
Different colors of paint
Paintbrush
White glue
Scissors
Egg carton
Cork
Four clothespins
Different colors of paint
Paintbrush
White glue
Scissors
- For the camel's humps, cut two cups out of the egg carton.
- Put two clothespins on each hump. They will be the four legs.
- For the neck, cut out the middle mart of an egg carton cup. Glue it to the humps.
- For the head, cut two ears out of the egg carton and glue them to the cork. Glue the cork to the neck.
- Paint the camel any color you wish. Paint the eyes, nose, and mouth. Let dry.
Coin Purse
Materials:
Cardboard juice container
Hook and loop fastener
Stapler
Scissors
White glue
Cardboard juice container
Hook and loop fastener
Stapler
Scissors
White glue
- Flatten the cardboard juce container with the help of an adult.
- Cut off the top and bottom of the container, leaving a small tab on the top.
- Fold in the sides of the cardboard container.
- Fold it in half and staple it in the middle. The coin purse is almost ready.
- To close the coin purse, glue a strip of hook and loop fastener to the tab and another one opposite it.
Piggy
Materials:
Toilet paper tube
Egg carton
Four corks
Different colors of paint
Paintbrush
White glue
Scissors
Toilet paper tube
Egg carton
Four corks
Different colors of paint
Paintbrush
White glue
Scissors
- For the head, cut out a cup from the egg carton and leave two tabs for the ears.
- Glue the head to the toilet paper tube.
- For the legs, glue the corks to the tube. Glue on a cardboard strip from the egg carton for the tail.
- Paint everything. Let dry.
- Paint the eyes, nose, and mouth. Let dry.
King Craft
From the book Easy Earth-Friendly Crafts in 5 Steps by Anna Llimos
Materials:
Small plastic container
Cork
Red cord
Bottle cap
Cloth scrap
Different colors of paint
Paintbrush
White glue
Scissors
Materials:
Small plastic container
Cork
Red cord
Bottle cap
Cloth scrap
Different colors of paint
Paintbrush
White glue
Scissors
- Cut a rectangle out of a cloth scrap. Glue it to the plastic container.
- Paint the king's face on a cork.
- Glue the cork on top of the scrap of cloth.
- For the beard and hair, unravel the red cord.
- Glue the beard and hair on the head. Glue a bottle cap on top for the crown. Let dry.
Subscribe to:
Posts (Atom)